Just imagine: To make a two-hour movie, a film crew works for several months, shooting hundreds of hours of video and doing thousands of takes. Then it all magically turns into a finished picture. Interesting and coherent, with complete thought and an engaging plot.
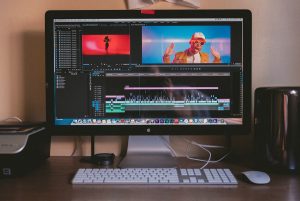
So you’ve got your footage ready. You can move on to the process of editing. In simplified terms, creating a YouTube video looks like this:
- Loading the footage into the video editor
- Cutting unnecessary frames.
- Gluing fragments
- Applying visual effects
- Layering of sound
- Saving in the correct format
In this article, you’ll learn about the basic principles of editing and get some tips on how to make an entertaining video in South Africa. If you still have questions about video editing after reading this article, visit smartyafrikaners.com and find a suitable online course.
Table of Contents
Loading and manipulating your footage.
Organize your footage. Assemble similar episodes and give them titles. You don’t want to confuse you later with which part of the video this or that piece refers to. By the way, you can always add new material to the already created project if necessary.
Stick to a scripted plan to keep the logic of events in the final video. Become the most picky viewer: if something in the frame does not look very good, it is better to remove or beat it somehow. Rewriting an episode is not always possible. That’s why we’ll once again emphasize the importance of takes.
Be brave enough to delete unsuccessful, extra episodes or those that don’t contain any useful information. Even experienced bloggers cut fragments they don’t like. The motive is simple: it’s better to leave less material, but it will be cool and easy to understand.
Cuts
This labor-intensive part of the work requires attention and perseverance. The remaining fragments are to assemble into a whole. And do it so that the movie goes smoothly and the change of plan occurs seamlessly. To do this, use cuts and transitions.
There are a lot of ways to paste video segments. The most common are the following:
- Hard Cut. The best known and easiest method where one frame is immediately replaced by another. Used less and less frequently, as with systematic use in the video, sharp transitions begin to irritate the viewer.
- Jump Cut. A method that makes a sharp jump in time. It preserves the action sequence. Often used in filming interviews, reviews, and music videos.
- L and J transitions. With the first method, the frame is replaced with a new one, but its sound keeps going, preserving the sequence of events. With the second method, the sound enters before the video appears.
- Cutting on Action. One frame replaces another, but the main action continues. This technique is often used when shooting action scenes.
- Cross-Cut. The alternating frames make it possible to show two different scenes occurring simultaneously but in different places.
- Cutaways. A frame is taken away from the main story or character to show what’s going on around, to emphasize details, or to increase tension:
- Match cuts. A technique in which two opposites are combined, but the logic and integrity of the narrative are maintained.
Video Clip Structure
Your video will be dynamic, understandable, and entertaining if it has three basic parts, which are essential to any video on YouTube:
- Caption. A frame that captures the essence of what is happening or attracts the audience’s attention. In fact, the splash screen is the face of the video. It should make you want to see what the video is about. What to put on the spoof is decided individually. Sometimes it’s appropriate to put the name of the theme of the video, and sometimes – a bright frame from the video with explanations. Popular bloggers often put their face in, as it is recognizable and works as a brand.
- Intro. The introduction is a kind of squeeze of all the information in the video. The standard length for YouTube is 3 seconds. During this time, you need to engage the audience in watching the video. Therefore, cut the most interesting shots, give them additional voiceovers and run in an accelerated slideshow. It’s the easiest option. Some bloggers create typical intros that they use in all their videos.
- Summary. Conclusions from what’s shown, calls to action, thank yous, etc. Anything you want to communicate additionally is placed in the final part of the video. There are no strict design requirements here. Remember that the longer the conclusion, the worse it will be watched.
We recommend paying attention to the footage as well. It is an animated or specially filmed video that is inserted in pauses between shots. It helps to shift attention and give the viewer a break from the information. Anything can be used as footage. Use the footage to break up the video, making it much more lively.
Work With Sound
The future video should be good not only in terms of visual design. Sound plays no less important role.
A sound row is usually mounted after the video sequence is ready. Choose successful takes, and replace the unsuccessful sound fragments with higher quality. Sometimes you can repeat the necessary piece of text. It is better to spend a little more time but get a good sound.
If the sound was recorded along with the video, it is also present in the frame. Some video editors allow you to remove the audio track from an existing video and work directly with it. What can be done with the sound?
- Remove background noise and extraneous sounds. Echoes, the noise of cars outside the window, birds’ voices – all this distracts from viewing. That’s why extraneous sound fragments should be removed. Or suppress by using other audio fragments.
- Cut out unnecessary parts. Even with flawless reading, minor speech defects are possible. You can remove them. Or save and then share with your friends.
- Replace part of the sound. The audio track is cut where you want it, and a new fragment is inserted.
- Balance the volume. Add in the right place, and make it quieter when your attention should shift to something else. Balance the sound so that the viewer is comfortable listening to it.
- Include sound effects. You can use jingles, background applause, and other sound elements to make your video more memorable.
- Mix. Tune the sound so that when one section fades out, another begins.
- Adjust. Use sound filters to change a sound file’s tone, speed, and other characteristics.
- Add volume. So that the sound is not just stereo but surround. And play well on modern audio systems:
It is best to create several audio tracks for each task. For example, put the voice on the first track, background music on the second, and sound effects on the third. And so on. It’s critical to synchronize video and audio. There is nothing more annoying than a lagged sound. Or vice versa, when the sound is ahead of events.